Back-basted Unit Applique
Jun. 13th, 2022 01:06 pm...a technique for doing unit applique without templates
Background:
Back-basting: in back-basting, the applique design is traced in reverse on the back side of the applique piece. Applique fabric is pinned in place on the front of the piece and basted along the traced line, then trimmed around the basting leaving roughly 1/8-3/16" seam allowance To stitch it down, the basting threads are clipped from the back, a short length (1-2") at a time. Then the applique piece is gently separated from the background, leaving the clipped stitches in place. The clipped stitches are the marking line for turning under the raw edge of the applique piece. They are removed as the piece is stitched in place.
Unit applique: When working on a large project, applique shapes with many small pieces can be difficult to work in place. In unit applique, these complicated shapes are assembled off the project using templates, and then stitched in place once complete.
This technique is an attempt to combine the two, eliminating the need for templates for unit applique.
Photos for this tutorial are labeled with the numbers referenced in the text; click the photo to enlarge if needed.
You will need:
Paper-piecing paper sheets or newsprint paper.
Thin-line black marker
Hand quilting thread and needle: use thread that contrasts with your applique fabrics.
Applique thread and needles
Tracing:
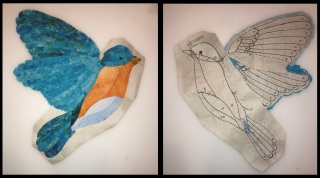
Flip your pattern over and trace the image on the back side of the pattern with a black thin-line marker; this makes it much easier to trace the image onto the working piece. Then use a lightbox or a sunny window to trace that image onto a paper piecing sheet. Mark the pattern and the working piece with REVERSE to remove any guesswork from the process, especially if you're like me and tend to work on projects off and on. (Figure 01)

Trim away the excess paper around the traced image, leaving a 1-2" margin. Round the corners of your trimmed shape to make it less likely to catch your thread when sewing.
If your pattern is marked with sewing order, transfer those numbers to the paper or keep the pattern close at hand. If it's not marked, take some time to work out sewing order, working from back to front of the applique piece.
Basting and sewing:
Turn your working paper right side up (traced image to the back), and place your applique fabric on the paper, covering the first shape to sew down. Set the fabric so that there's at least 1/4" seam allowance all around the shape. You can use a lightbox to align the fabric or set pins in the paper so that you can feel them through the fabric to line everything up. Pin your fabric to the paper, setting the pins just outside your shape.
Flip the piece over, and using your heavy needle and quilting thread, baste the fabric onto the paper. Baste along the outer edge of the pattern piece with small running stitches, sewing right on the traced line. These are your marking stitches. Just before you reach the part of the fabric that will be under another applique piece, take a small backstitch. The backstitch helps the marking stitches stay in place when other basting is clipped. For the part of the piece that will be under another piece, move your stitching line to about 1/8" outside of the pattern line, and change your basting stitches to something that is visually distinct from the marking stitches. I make larger stitches with small gaps so I can easily tell them from the marking basting. These are your structural basting stitches, holding everything secured to the paper.
Once the piece is basted, trim around the shape. Leave at least 1/4" seam allowance on the outside edge; that provides a little buffer for the edge that is going to see a lot of manipulation as the rest of the pieces are sewn into place. Trim the edges that will be covered by another piece close to the structural basting stitches. (Figure 02)

Align the next piece of fabric and pin in place as before. When you baste this piece, mark the start and end of the seam you will sew to attach the two shapes by taking a small stitch perpendicular to the sewing line. When the two pieces separate at the outer edge of the applique, make that perpendicular stitch just before that point. Where the two pieces separate inside the applique shape, mark just past the intersection in the seam allowance. Take a small backstitch at either end of the basting along the outer edge of the piece. This outer edge stitching is what you'll use to line up the applique piece on the main project, and it takes a lot of tugging and folding while we're assembling the piece. Backstitching helps everything stay in place so you don't lose your marking stitches. Do your structural basting and trim the piece as before, leaving 1/8-3/16" seam allowance along the seam joining the two pieces. (Figure 03)
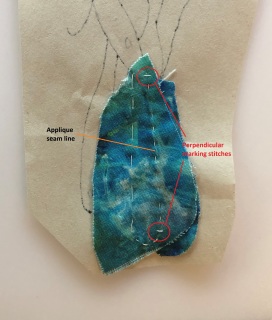
Turn the paper over and clip the first perpendicular stitch on the reverse side of the paper. Clip every basting stitch for about an inch to two inches along the seam line. Some of the marking stitches may have popped through the paper while you were making them; often you can hunt for them with the point of your scissors, but if they can't be found leave them for later. Set your applique needle with matching thread just at the perpendicular marking stitch, and very gently lift the applique piece away from the paper, holding onto the clipped stitches so they stay in place on the top fabric. If the fabric won't lift because a stitch couldn't be clipped from the reverse, carefully reach between the layers with your scissors and snip it to release it.
Turn under the seam allowance a little at a time, using the clipped stitches as your guide and clipping curves as needed. Sew down the turned edge, flicking the cut basting stitches out as you come to them. A little before you reach the end of the clipped stitches, turn the piece over and clip another short section; continue clipping and sewing to the perpendicular stitch at the end of the seam. (Figure 04)
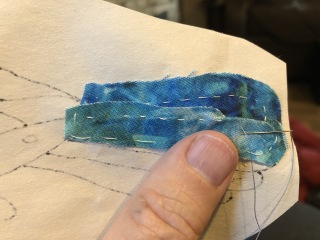
If your seam ends in a seam allowance, you can knot your thread on top of the piece. If it ends at a visible point, turn the piece over and use your needle to tear away a scrap of the paper so you can see the fabric, and knot your thread there on the underside. Not all of your applique stitches will go through the paper, but that's not a concern.
Carry on adding pieces until the unit applique is complete. In some spots the basting will not hold the applique down well enough to ensure that everything stays flat and even as you are working; in that case, use a pin or extra basting on the loose part to hold things securely while you finish the piece. (Figure 05)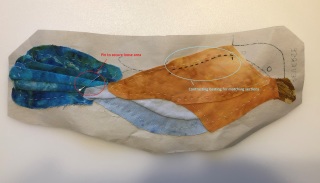
Working with sections:
If you are working with an exceptionally complicated applique, you may choose to do it in sections. In that case, when tracing the pattern, on the bottom piece trace the outlines where two sections will join with a dashed line, and trace a little of the top section on the bottom piece also. When you baste that dashed line do it in a contrasting thread to your regular basting thread. Mark the exact endpoints where the two sections come together with perpendicular stitches. When you attach the two sections, remove the paper from the part of the upper section that overlaps the bottom section. Use the two different basting lines to line everything up, pin it in place, and then baste the top section onto the paper of the bottom section. Clip both basting threads on the underside, and applique the sections together, matching the basting lines. (Figure 06)
Removing the paper:
Once everything is sewn in place, clip and remove the structural basting. Lay the piece on a surface with a little give (I use my wool pressing mat) reverse side up, and run the point of your needle carefully along the stitching and basting lines. You're trying to score the paper without damaging the fabric or the stitching. Gently pull the paper away from the fabric a little at a time. Hold the fabric and the stitching down securely as you go to keep either from being distorted or damaged; if needed, repeat the scoring. Try folding back the paper and pulling it off parallel to the fabric to minimize stress on the stitches. The paper will come away in shreds and tatters, and tiny pieces may stay stuck in the stitching. These can be removed by carefully rubbing at them or picking them out with a needle. (Figure 07)
Final assembly:
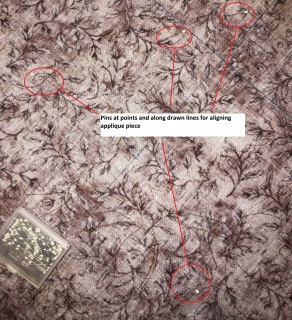
Once all the paper has been removed, place the unit applique on the applique project. Set pins in the background fabric from the reverse side at points where it will be easy to feel them under the unit applique to line things up correctly; sharp points and corners on the unit applique are good for this. (Figure 08)
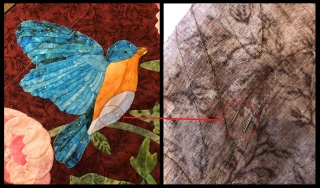
Pin it in place and check to make sure it's aligned correctly at a few spots by pinning along the basted outline and making sure the pin falls on the drawn line on the reverse side. (Figure 09)
If it won't line up precisely at all points, lay it out so it lies flat and looks good on the applique piece instead of trying for an exact match with the drawing. Baste the unit applique in place roughly 1/4 -1/2" from the outer seam line; this lets you scrunch the piece up in your hand as much as needed to stitch it down without getting stabbed by the pins or having the piece shift as you sew. (Figure 10)
Trim the outer seam allowance to 1/8-3/16", doing a few inches at a time. Flip down the edge of the unit applique to clip the basting threads, then applique the piece in place as you did the unit applique. (Figure 11)
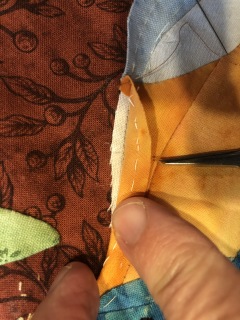
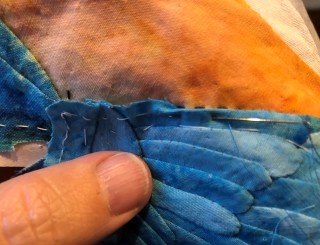
Just before you reach places where two pieces overlap on the unit applique, pause so that you can turn under the junction without risking catching the seam allowance of the second piece in the stitching on the first piece. Turn the two pieces under at the intersection and hold them in place until securely appliqued down. (Figure 12)
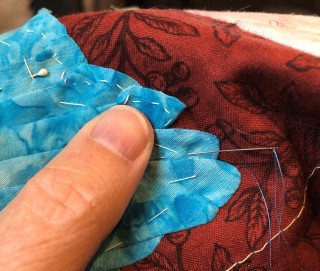
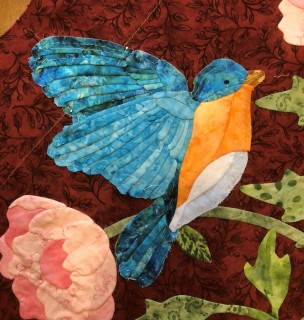
Here is the mostly finished piece in place on the applique project. The last wing portion will be sewn down once the frame applique is put in place, since it will run under the wing. (Figure 13)
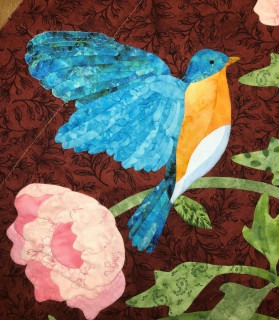
Background:
Back-basting: in back-basting, the applique design is traced in reverse on the back side of the applique piece. Applique fabric is pinned in place on the front of the piece and basted along the traced line, then trimmed around the basting leaving roughly 1/8-3/16" seam allowance To stitch it down, the basting threads are clipped from the back, a short length (1-2") at a time. Then the applique piece is gently separated from the background, leaving the clipped stitches in place. The clipped stitches are the marking line for turning under the raw edge of the applique piece. They are removed as the piece is stitched in place.
Unit applique: When working on a large project, applique shapes with many small pieces can be difficult to work in place. In unit applique, these complicated shapes are assembled off the project using templates, and then stitched in place once complete.
This technique is an attempt to combine the two, eliminating the need for templates for unit applique.
Photos for this tutorial are labeled with the numbers referenced in the text; click the photo to enlarge if needed.
You will need:
Paper-piecing paper sheets or newsprint paper.
Thin-line black marker
Hand quilting thread and needle: use thread that contrasts with your applique fabrics.
Applique thread and needles
Tracing:
Flip your pattern over and trace the image on the back side of the pattern with a black thin-line marker; this makes it much easier to trace the image onto the working piece. Then use a lightbox or a sunny window to trace that image onto a paper piecing sheet. Mark the pattern and the working piece with REVERSE to remove any guesswork from the process, especially if you're like me and tend to work on projects off and on. (Figure 01)

Trim away the excess paper around the traced image, leaving a 1-2" margin. Round the corners of your trimmed shape to make it less likely to catch your thread when sewing.
If your pattern is marked with sewing order, transfer those numbers to the paper or keep the pattern close at hand. If it's not marked, take some time to work out sewing order, working from back to front of the applique piece.
Basting and sewing:
Turn your working paper right side up (traced image to the back), and place your applique fabric on the paper, covering the first shape to sew down. Set the fabric so that there's at least 1/4" seam allowance all around the shape. You can use a lightbox to align the fabric or set pins in the paper so that you can feel them through the fabric to line everything up. Pin your fabric to the paper, setting the pins just outside your shape.
Flip the piece over, and using your heavy needle and quilting thread, baste the fabric onto the paper. Baste along the outer edge of the pattern piece with small running stitches, sewing right on the traced line. These are your marking stitches. Just before you reach the part of the fabric that will be under another applique piece, take a small backstitch. The backstitch helps the marking stitches stay in place when other basting is clipped. For the part of the piece that will be under another piece, move your stitching line to about 1/8" outside of the pattern line, and change your basting stitches to something that is visually distinct from the marking stitches. I make larger stitches with small gaps so I can easily tell them from the marking basting. These are your structural basting stitches, holding everything secured to the paper.
Once the piece is basted, trim around the shape. Leave at least 1/4" seam allowance on the outside edge; that provides a little buffer for the edge that is going to see a lot of manipulation as the rest of the pieces are sewn into place. Trim the edges that will be covered by another piece close to the structural basting stitches. (Figure 02)

Align the next piece of fabric and pin in place as before. When you baste this piece, mark the start and end of the seam you will sew to attach the two shapes by taking a small stitch perpendicular to the sewing line. When the two pieces separate at the outer edge of the applique, make that perpendicular stitch just before that point. Where the two pieces separate inside the applique shape, mark just past the intersection in the seam allowance. Take a small backstitch at either end of the basting along the outer edge of the piece. This outer edge stitching is what you'll use to line up the applique piece on the main project, and it takes a lot of tugging and folding while we're assembling the piece. Backstitching helps everything stay in place so you don't lose your marking stitches. Do your structural basting and trim the piece as before, leaving 1/8-3/16" seam allowance along the seam joining the two pieces. (Figure 03)

Turn the paper over and clip the first perpendicular stitch on the reverse side of the paper. Clip every basting stitch for about an inch to two inches along the seam line. Some of the marking stitches may have popped through the paper while you were making them; often you can hunt for them with the point of your scissors, but if they can't be found leave them for later. Set your applique needle with matching thread just at the perpendicular marking stitch, and very gently lift the applique piece away from the paper, holding onto the clipped stitches so they stay in place on the top fabric. If the fabric won't lift because a stitch couldn't be clipped from the reverse, carefully reach between the layers with your scissors and snip it to release it.
Turn under the seam allowance a little at a time, using the clipped stitches as your guide and clipping curves as needed. Sew down the turned edge, flicking the cut basting stitches out as you come to them. A little before you reach the end of the clipped stitches, turn the piece over and clip another short section; continue clipping and sewing to the perpendicular stitch at the end of the seam. (Figure 04)

If your seam ends in a seam allowance, you can knot your thread on top of the piece. If it ends at a visible point, turn the piece over and use your needle to tear away a scrap of the paper so you can see the fabric, and knot your thread there on the underside. Not all of your applique stitches will go through the paper, but that's not a concern.
Carry on adding pieces until the unit applique is complete. In some spots the basting will not hold the applique down well enough to ensure that everything stays flat and even as you are working; in that case, use a pin or extra basting on the loose part to hold things securely while you finish the piece. (Figure 05)

Working with sections:
If you are working with an exceptionally complicated applique, you may choose to do it in sections. In that case, when tracing the pattern, on the bottom piece trace the outlines where two sections will join with a dashed line, and trace a little of the top section on the bottom piece also. When you baste that dashed line do it in a contrasting thread to your regular basting thread. Mark the exact endpoints where the two sections come together with perpendicular stitches. When you attach the two sections, remove the paper from the part of the upper section that overlaps the bottom section. Use the two different basting lines to line everything up, pin it in place, and then baste the top section onto the paper of the bottom section. Clip both basting threads on the underside, and applique the sections together, matching the basting lines. (Figure 06)

Removing the paper:
Once everything is sewn in place, clip and remove the structural basting. Lay the piece on a surface with a little give (I use my wool pressing mat) reverse side up, and run the point of your needle carefully along the stitching and basting lines. You're trying to score the paper without damaging the fabric or the stitching. Gently pull the paper away from the fabric a little at a time. Hold the fabric and the stitching down securely as you go to keep either from being distorted or damaged; if needed, repeat the scoring. Try folding back the paper and pulling it off parallel to the fabric to minimize stress on the stitches. The paper will come away in shreds and tatters, and tiny pieces may stay stuck in the stitching. These can be removed by carefully rubbing at them or picking them out with a needle. (Figure 07)

Final assembly:
Once all the paper has been removed, place the unit applique on the applique project. Set pins in the background fabric from the reverse side at points where it will be easy to feel them under the unit applique to line things up correctly; sharp points and corners on the unit applique are good for this. (Figure 08)

Pin it in place and check to make sure it's aligned correctly at a few spots by pinning along the basted outline and making sure the pin falls on the drawn line on the reverse side. (Figure 09)

If it won't line up precisely at all points, lay it out so it lies flat and looks good on the applique piece instead of trying for an exact match with the drawing. Baste the unit applique in place roughly 1/4 -1/2" from the outer seam line; this lets you scrunch the piece up in your hand as much as needed to stitch it down without getting stabbed by the pins or having the piece shift as you sew. (Figure 10)

Trim the outer seam allowance to 1/8-3/16", doing a few inches at a time. Flip down the edge of the unit applique to clip the basting threads, then applique the piece in place as you did the unit applique. (Figure 11)

Just before you reach places where two pieces overlap on the unit applique, pause so that you can turn under the junction without risking catching the seam allowance of the second piece in the stitching on the first piece. Turn the two pieces under at the intersection and hold them in place until securely appliqued down. (Figure 12)

Here is the mostly finished piece in place on the applique project. The last wing portion will be sewn down once the frame applique is put in place, since it will run under the wing. (Figure 13)


